We are working on using iRODS, as a way to increase storage for users of the HUB. Possible uses include simple staging of data for simulation, and housing searchable collections of documents. Some theory about our approach can be found in the paper here.
We were using two servers to test iRods at CCR. The first was both a data and metadata server. The second was just a data server. Now, we upgraded to iRODS 3.0 and are only using one server.
Prerequisites
iRods requires access to the CCR irods server (irods.ccr.buffalo.edu). By default, the hub does not allow outbound network access so user will need to be granted access via the Joomla administration interface. Each user requiring irods access must be
- a hub administrator
- a member of the network group
Note: It may take up to an hour for access to propogate once a user is added to the group.
Clients
* iDrop: Java client. https://code.renci.org/gf/project/irodsidrop/
Basic concepts
- collection: a directory
- resource: represents a physical data server location that can hold many collections
- zone: multiple resources can be members of the same zone
Useful commands
- iinit: enter your password and it will get cahed so you don’t have to give your password for every command.
- ils: list files
- imkdir: create a directory (also called a collection). NOTE: A directory will not show up in the server directory structure until a file is put in it using iRods.
imkdir username/folder
- iput: put a file into iRods.
iput foo.tar username/folder
- ireg: copy a directory revursively into iRods. NOTE: If you add files to the actual physical directory, this is not reflected in iRODS. {{{
#> ireg -C /data/iRODS/testIreg/ /tempZone/home/rods/newCol #> ils newCol /tempZone/home/rods/newCol: foo1 foo2
#> cd testIreg/ #> touch bar #> ils newCol /tempZone/home/rods/newCol: foo1 foo2
}}}
Current iRods Configuration
server: irods.ccr.buffalo.edu
port: 1247
zone: vhub
resource: vhub-ccr-buffalo
Web client: : irods.ccr.buffalo.edu/irodsweb/
Public files: irods.ccr.buffalo.edu/public/
Setup for New Users
Ask the administrator to create an irods account for you with a password you’d like.
To create the necessary files for irods to run, download the irods_newuser.sh (4 KB, uploaded by Kyle Marcus 1 decade 2 years ago) bash script and execute it in a terminal.
To use the default user annonymous and only be able to read the public directory on irods, you can just run the script as follows:
> chmod +x irods_newuser.sh
> ./irods_newuser.sh
Do you want to make 'use irods' persistent? (y/n) y
If you want to change the settings to use a different username, zone, etc, append the -i argument to the end of the name of the script. Here is a example of changing the username to vhub.
#> chmod +x irods_newuser.sh
#> ./irods_newuser.sh -i

Answer the following questions to configure iRODS
Press ENTER for the default setting for each question

iRODS server name [irods.ccr.buffalo.edu]:
iRODS port [1247]:
iRODS username [anonymous]: vhub
iRODS zone [vhub]:
iRODS resource name [vhub-ccr-buffalo]:
iRODS home dir [/vhub/home/vhub]:
iRODS current working dir [/vhub/home/vhub]:
Do you want to make 'use irods' persistent? (y/n) y
Enter your current iRODS password:
After the script has run, you will be able to use the i-commands and use files mounted in your irods directory in the ~/irods directory on your hub environment. To see if everything is working correctly you can type ils or ls ~/irods and you should see the files that are currently in your home directory in irods.
If you would just like to download the irodsEnv file and modify it yourself, you can download it below. (The file below is already configured to run as the annonymous user and read the public directory).
File: irodsEnv (435 B , uploaded by Kyle Marcus 1 decade 2 years ago)
If you decided to just download the irodsEnv file, then you need to follow the following 7 steps. If you ran the irods_newuser.sh script, then you can skip these 7 steps.
1. Modify the user name inside the file linked above, and change the file name to .irodsEnv
2. Create a folder name .irods in the user’s home directory and place .irodsEnv in the folder.
3. Create a folder named irods in your home directory. This folder will be used as the mount location for the the iRODS filesystem.
4. Type the command use irods in your workspace command line to be able to run icommands.
5. Create a bash profile file name .bash_profile with the following content:
if [ -n $IRODS_MOUNT -a -e $IRODS_MOUNT ]; then
  $IRODS_MOUNT
fi
6. To make your password persist, type iinit and enter your irods password.
7. Then, run the command source .bash_profile
After these steps you should be able to use the i-commands and use files in your ~/irods directory.
.bashrc Files For Users
Once icommands and irodsFs are installed into /apps the script will read similar to this:
which mountIrodsFs >& /dev/null
if [ 0 = $? ]; then
  mountIrodsFs
fi
Setup New Groups
To create a group, do the following
1. Create the group
iadmin mkgroup testgroup
2. Add users to the group
iadmin atg testgroup kmarcus
iadmin atg testgroup smgallo
When a group is created, a home directory for the group is also created.
You can also modify a collection or file to allow a group/user to access it
ichmod read testgroup testgroupdir
ichmod write testgroup testgroupdir
ichmod own testgroup testgroupdir
Google Groups question on group permissions
Using iRods with the Submit Command
Make sure preprocess_irods.sh and postprocess_irods.sh are set to executable
chmod +x preprocess_irods.sh
chmod +x postprocess_irods.sh
Also when using the submit command, be sure to include the preprocess_irods.sh and postprocess_irods.sh files
submit ... -i preprocess_irods.sh -i postprocess_irods.sh ...
If you are placing the output of a job into iRods, make sure to use the -q option with submit so that there will be no limit on the file size that you can create.
modification to /san/user/vhub/u2/bin/receiveinput.sh
IRODS_INPUT_NAME="preprocess_irods.sh"
if  [ -x ./$IRODS_INPUT_NAME ]; then
  ./$IRODS_INPUT_NAME
fi
modification to /san/user/vhub/u2/bin/transmitresults.sh
IRODS_OUTPUT_NAME="postprocess_irods.sh"
if [ -x ./$IRODS_OUTPUT_NAME ]; then
  ./$IRODS_OUTPUT_NAME
fi
iRods FUSE notes
Install: Need to install libfuse-dev to get the header files in the same path as the library
edit iRODS/config/config.mk
uncomment IRODS_FS = 1
set fuseHomeDir=path/to/fuse where the path is just above include/fuse.h and lib/libfuse.a
on your vhub account this is simply fuseHomeDir=/usr
in iRODS/client/fuse do make
Add another path so that you can mount with the command irodsFs
NOTE: You cannot unmount on your vhub account, once you’ve mounted irods. Only a vhub dministrator can run fusermount.
export PATH=/apps/irods/3.1.0/icommands/bin:/apps/irods/3.1.0/fuse/bin:$PATH
Making Files Publically Available
Public Share Directory
While using iRODS you may want to share files with different users. One way to do this is to put the files you want to share in /vhub/home/public. Any user that is on the iRODS system can read and write to this public directory.
icp foo /vhub/home/public
ADMIN NOTE: When users are created, they are automatically added to the share group. The permissions on the /vhub/home/public directory is set up so anyone in the share group is allowed r/w access.
If you want to allow users that do not have an account on the iRODS system to access the public share directory, you need to create the anonymous user. Create the user just like all the other users, but you do not have to set the password.
iadmin mkuser anonymous rodsuser
After creating the user, allow that user to read the /vhub/home/public directory.
ichmod read anonymous /vhub/home/public
ichmod inherit anonymous
After these steps, anyone that does not have an account on the irods system is able to read the files located in the /vhub/home/public directory. They are not able to write or go up the directory structure.
In order for users to login to iRODS with this anonymous user, all you have to do is use the username anonymous with any password.
The username anonymous is a special account name that is recognised in the iRODS system.
Admin’s can use the following script to automate the process of creating the necessary files needed to use the anonymous user in vhub and mount the /vhub/home/public directory on iRODS to ~/irods directory on the users filesystem on vhub.
File : irods_anonymous.sh (4 KB, uploaded by Kyle Marcus 1 decade 2 years ago)
Public Share Web Access
Data placed in the public share directory is also made available via the following url: http://irods.ccr.buffalo.edu/public/
Administrator Tasks and Commands
Put the icommands in the path for every user
install .irods directory for every user and provide an irodsEnv file with their Hub ID as the user name
Run iinit once with their user name and password. This will create the .irods/.irodsA rile which holds the user’s encrypted password so that they won’t have to enter their password to do an icommand.
in irods, create a home directory for the user and set the group to the user name.
Use irodsFs to mount an empty folder named irods in the user’s home directory
irodsFs irods
Create an iRods User
As the ‘rods’ administrator (irods vhub user), create a new hub user:
1. Create new user (use “rodsadmin” rather than “rodsuser” if they are an admin)
iadmin mkuser username#vhub rodsuser
2. Set user’s password
iadmin moduser username password somepassword
3. Make home directory for new user
imkdir /vhub/home/username
4. Let user rwx her home directory
ichmod -M own username /vhub/home/username
5. Let the vhub user rwx user’s home directory and subdirectories
ichmod -M read vhub /vhub/home/username
ichmod -M write vhub /vhub/home/username
ichmod -M inherit /vhub/home/username
NOTE: We need the -M option to operate in admin mode for changing ownership and file permissions.
For example, to create a new user “scarn”
iadmin mkuser scarn#vhub rodsuser
iadmin moduser scarn password ********
imkdir scarn
ichmod -M own scarn /vhub/home/scarn
ichmod -M read vhub /vhub/home/scarn
ichmod -M write vhub /vhub/home/scarn
ichmod -M inherit /vhub/home/scarn
Users can use iinit to initialize their password into the ~/.irods/.irodsA file
Users can then do
iput
iput foo username
Edit .bashrc in iRods server(done):
PATH=/data/iRODS/iRODS/clients/icommands/bin:$PATH
Install iRods on vhub@u2-grid
edit .bashrc
PATH=/san/user/vhub/u2/iRODS/clients/icommands/bin:$PATH
iadmin mkuser username rodsuser
iadmin mkuser vhub rodsadmin
Add Files Directly to iRods Server
You can place files directly inside the iRods directory structure on the sever and the register them later.
mv foo.txt /data/iRODS/iRODS/Vault/home/public
ireg -R vhub-ccr-buffalo /data/iRODS/iRODS/Vault/home/public/foo.txt /vhub/home/public/foo.txt
Transferring Large Files
When you send or receive a file to/from iRODS that’s over 32 MB, it starts opening multiple ports so it can multithread the data transfers. You need to make sure the correct ports are open or the data transfer will not work.
Open ports 20,000 to 20,199 in the firewall
For irods@irods1.ccr.buffalo.edu edit ~/iRODS/config/irods.config to say
$SVR_PORT_RANGE_START = '20000';
$SVR_PORT_RANGE_END = '20199';
and also
~/iRODS/scripts/perl/irodsctl.pl
to say
$svrPortRangeStart=20000;
$svrPortRangeEnd=20199;
Then restart the server
irodsctl restart
Note: when doing the multithreaded data transfers we had a problem with the server only listening on the internal IP address.
> iput -V -f test_dir_timing_40mb_80files.tar kmarcus/test_time
NOTICE: irodsHost=irods1.ccr.buffalo.edu
NOTICE: irodsPort=1247
NOTICE: irodsDefResource=demoResc
NOTICE: irodsHome=/vhub/home
NOTICE: irodsCwd=/vhub/home
NOTICE: irodsUserName=kmarcus
NOTICE: irodsZone=vhub
>From server: NumThreads=2, addr:10.6.1.20, port:20169,
cookie=810769104
ERROR: connectToRhostPortal: connectTo Rhost 10.6.1.20 port 20169
error, status = -347000
Fix: edit ~/iRODS/server/config/irodsHost to say:
localhost irods1.ccr.buffalo.edu 10.6.1.20
This tells iRODS to prefer the interface irods1.ccr.buffalo.edu when binding.
Information for this fix was provided by Chris Smith on iRODS Chat
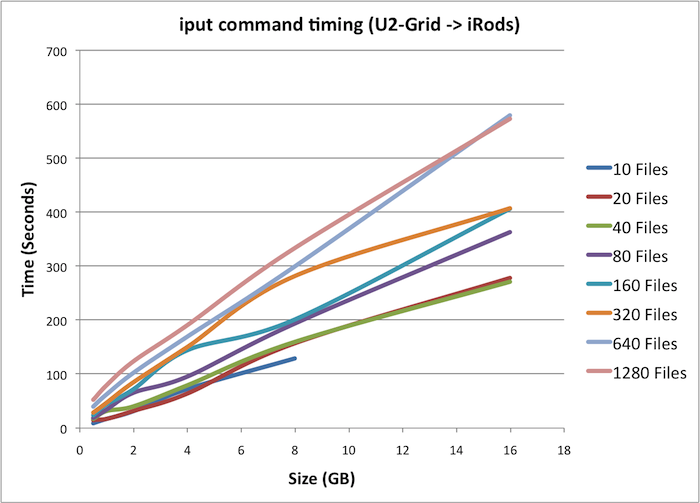
iRods Timing
Creating iRods Rules
Documentation on iRods rules can be found here
iRods 3.0 has added new rule syntax
Example iRods Rule Setup
For the example rule, we have a directory on irods (/irods/home/public) where the ‘anonymous’ user is able to download files. For the files in this public directory we also want to serve them on a web page. One way we came up with to do this was to add the ‘apache’ user to the ‘irods’ group and change all the permissions on the files in the public directory so that the group permissions were readable (this way the apache server running as ‘apache’ could read the files, but the ‘irods’ user could still do anything it need to do with the files). In order to do this I came up with the following rule which is located at server/config/reConfigs/publicGroupPermissions.re. This rule uses the ‘on’ keyword as its main logic. When the $objPath (variable that is defined by the irods session) is in the public directory, it will then call a shell script to change the permissions on all the files in that public directory. Writing to the log file with msiWriteRodsLog is not necessary, but it is useful for debugging purposes.
publicGroupPermissions {
   on ($objPath like "/vhub/home/public/*") {
      msiExecCmd("publicPermissions","null","null","null","null",*Result);
      msiWriteRodsLog("--- INSIDE publicGroupPermissions ---",*Status);
   }
}
this rule will call the publicPermission script (server/bin/cmd), its permissions set to execute. This script will change the group permissions for all the files in the public directory. Here is the server/bin/cmd/publicPermissions shell script:
#!/bin/sh
chmod g+r /data/iRODS/iRODS/Vault/home/public/*
Then add the publicGroupPermissions rule file to the server/config/server.config file (this is where all the rule files that are going to be used are defined, they are comma seperated).
-- reRuleSet core
++ reRuleSet core,publicGroupPermissions
Finally, you must specify when the rule should be called. In this case we wanted the rule to be called when someone put a file into the iRods public directory. To do this, you would use the iput command to add file. To execute the publicGroupPermissions rule when the iput command is used, the rule must be added to the server/config/reConfigs/core.re file. The place where we want to add our rule is acPostProcForPut, this is the function that gets executed after iput has succeeded.
-- acPostProcForPut { }
++ acPostProcForPut { publicGroupPermissions; }
After all of this is in place and all the permissions on the files are properly set, restart the server.
./irodsctl restart
To test this rule, start placing file in the public directory and then look at the permissions in Vault/home/public, you should now see that all the files are now readable by the irods group.
Useful Notes
- rules ending in .re are 3.0 syntax
- rules must be located in: server/config/reConfigs/
- scripts called from rules must be located at: server/bin/cmd/
- rule config file: server/config/server.config
- rules must be comma seperated
- example rules: clients/icommands/test/rules3.0/
- iRods 3.0 api documentation
- watch log files for debugging
- iRods:
tail -f server/log/rodsLog.YYYY.MM.DD - rules engine:
tail -f server/log/reLog.YYYY.MM.DD
- iRods:
- The users home directory on irods: Vault/home/
- Session variables listed in server/config/reConfigs/core.dvm, more info in iRods Primer book
iRods Clients
Currently we are using the old extjs iRods web client. This was downloaded from code.renci.org/gf/project/irodsphp/. The files were extracted into the clients directory in the iRODS home directory. Then, an alias was created in Apache to point to this directory. Everything works good when the STRICT option is turned off in the iRods config. The STRICT setting determines what the rodsuser can see in a directory. If the STRICT setting is on, then a rodsuser user can only see the contents of their directory. If it is off, then the rodsuser user is able to see all the files, however they are only able to read files that they own. Note, that the STRICT setting does not effect the rodsadmin user.
To turn the setting on and off, you have to edit the file iRODS/server/config/reConfigs/core.re
On: acAclPolicy {msiAclPolicy("STRICT"); }
Off: acAclPolicy { }
If you deceide to turn the STRICT setting on, you then need to change the permissions on /vhub and /vhub/home so that the web client can read these directories for a normal rodsuser user. Do the following to change the permissions:
> ichmod read public /vhub
> ichmod read public /vhub/home
Once this is complete, both a rodsuser, and a rodsadmin user will be able to log into the web client and everything should work.
Useful links for admins/developers
iRODS Primer: Integrated Rule-Oriented Data System Morgan & Claypool, 2010 (PDF)
Troubleshooting
Client cannot connect to server
Server may go down unexpectedly. Admin should log onto irods1.ccr.buffalo.edu, change to the iRods directory and type
irodsctl restart
It’s better to use restart than istart because sometimes the SQL server has gone down but the iRODS daemon is still running. istart will not resart the database.
Check the server log to see whether the restart succeded. The log is in iRODS/server/log and it is named by the date, e.g. rodsLog.2010.7.11
vhub cannot access the users file
The user must do the command
ichmod inherit username
ichmod -r own vhub /vhub/home/username
Misc Notes
Changing the iRods Server
Rename resource
iadmin modresc oldName name newName
edit config/irods.config
$RESOURCE_NAME = 'newName';
restart the server
./irodsctl restart
Change hostname
stop the server
./irodsctl stop
Edit the following files, changing the host name to the new address:
-
.odbc.iniin the home directory
-
.irods/.irodsEnvin home directory
-
pgsql/etc/odbc.iniin the Postgres directory
-
server/config/server.configin iRODS distribution directory
Edit server/config/irodsHost
localhost new-host-name 10.122.1.8
Start iRods again
./irodsctl start
Finally, modify the address of the local resource
iadmin modresc demoResc host new-host-name
Move a collection or file to a specific server
iphymv -r resource2Collection -R demoResc2
-r recursive -R resource name
The “mount” always looks the same, regardless of the physical location. You can move a file to any data server.
Idea for submitted apps to get irods files
Use file browser to get path to file.
- Parse path to get file name.
- when submit arrives, it makes a symbolic link to the file name and name the link with the file name.
- remove the symbolic link after the app runs.
ln -s irods/username/pathToFile/filename filename
- submit execs app, file “resides” in cwd.
rm filename