This workflow describes how a Ghub user may develop, test, troubleshoot, and deploy a new tool on the Ghub site. This workflow assumes the user has developed the tool using the C language; the tool GUI is developed using Rappture.
For more details about how to develop and deploy a tool on the Ghub, refer to Create a Hub Tool with Rappture Builder.
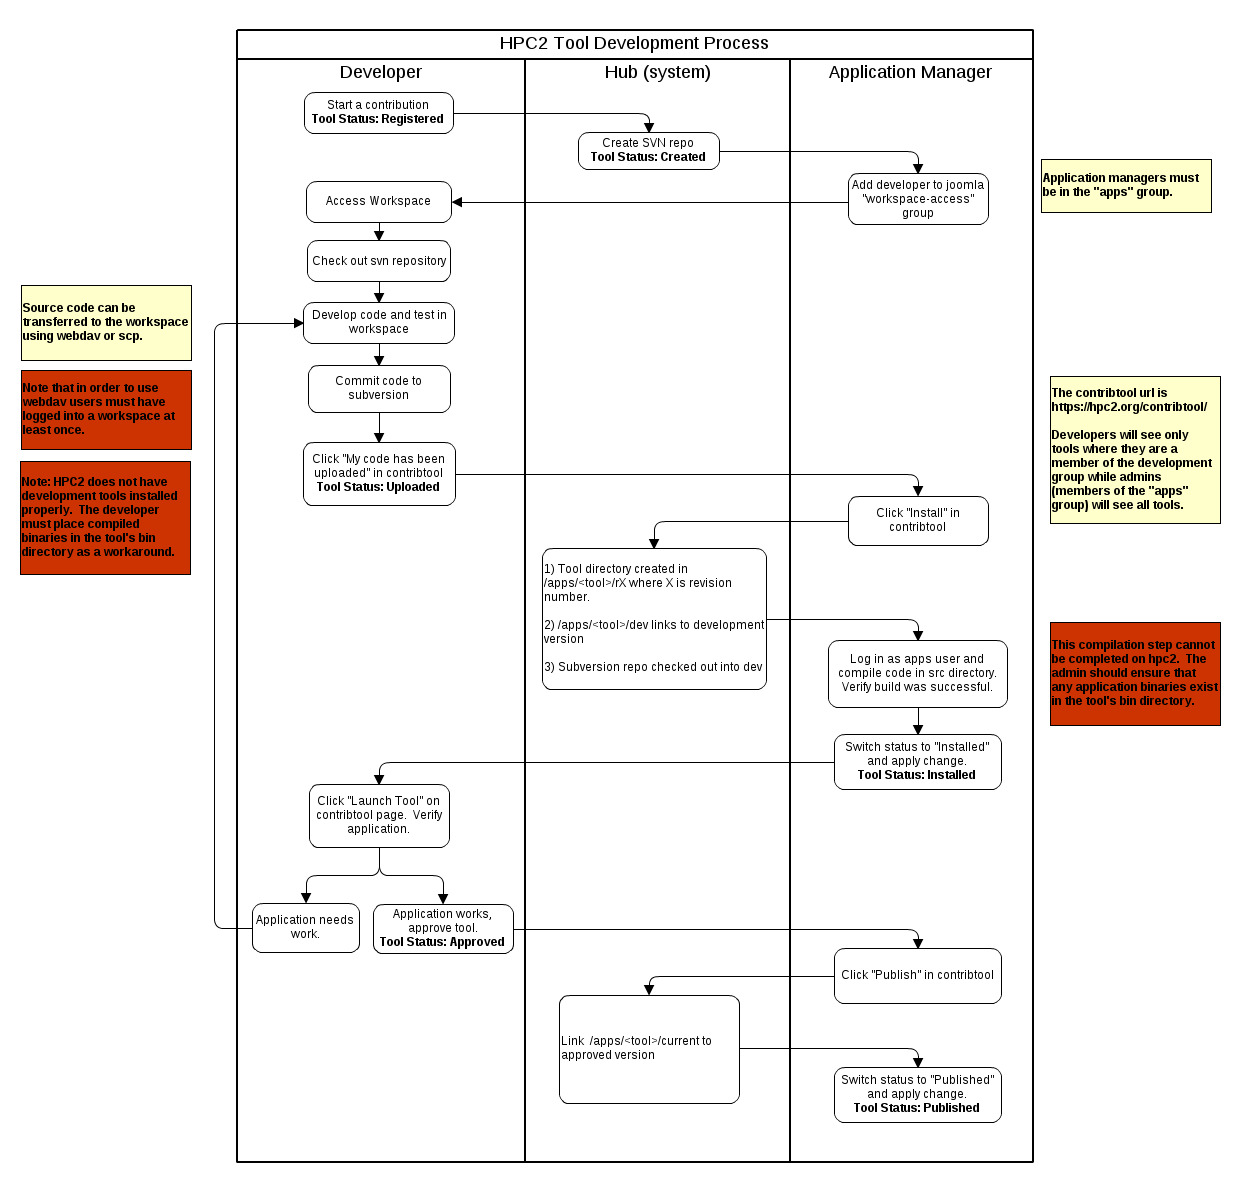
Register New Tool
1. An existing Ghub user logs in and accesses the Contribution form.
2. Using the form, the user registers a new tool. In these instructions, the tool is called toolname.
Ghub creates these items for the new tool:
- tool directory, under /apps/toolname
- tool subversion repository
- Workspace access for the user
tool status: REGISTERED
Upload and Test Basic Tool
3. The user uploads working code for the new tool onto the Ghub server. The tool is just a program that accepts inputs and generates outputs. The user compiles and tests this basic tool in the Ghub Workspace.
- upload options include sftp and WebDAV
- application space should be organized this way in the user workspace:
~/apps/toolname/
	test/		- useful for testing basic tool code
				in this phase of dev
	repo/		- houses the local svn repository
				(checked-out code version)
tool status: CREATED
4. From the Workspace, the user checks out the Subversion directory structure into ~/apps/toolname/repo. From the ~/apps/toolname directory:
$ svn checkout https://theghub.org/tools/toolname/svn/trunk repo
This command creates the correct directory structure for the tool.
Create Tool GUI
5. From the Workspace, the user creates a tool GUI using Rappture. From the ~/apps/toolname/repo subdirectory:
$ rappture -build
This command auto-generates a GUI that the Ghub will use as a wrapper for the new tool.
The user must edit the following files so that the tool can run on Ghub:
- rappture/tool.xml
- src/Makefile
- src/main.c
Build and Test Tool and GUI
6. From the Workspace, the user builds and tests the tool:
- run make in src/ directory
- test the tool in the Workspace by running invoke from the ~/repo directory:
$ ./middleware/invoke
- fix paths or bugs as needed
Check Tool and GUI in to Subversion
7. From the Workspace, the user checks working code into the Ghub’s Subversion repository, from the ~/repo/ directory:
- add all new files to Subversion, using a command like:
$ svn add path1/filename1 path2/filename2
- Commit all files to the Subversion repository, using the command:
$ svn commit
8. The user clicks/checks “My code has been uploaded” in the Contribtool page for the tool. IMPORTANT: If the tool must be compiled, be sure to leave a note to the administrator in the provided text box outlining the specific steps to take!
tool status: UPLOADED
Admin: Install Tool on Hub
9. The Ghub Administrator receives email about the new tool’s status change. The administrator must install the tool on Ghub as follows:
- in Contribtool, click the “Install” link for the tool
- if needed: in the Workspace, compile the tool in src/ and verify the executable
- in Contribtool, select Install from the dropdown, add comments as needed, and click Submit.
tool status: INSTALLED
This tool status change flips the symbolic link /apps/toolname/dev/ to point to the most recent revision of the tool.
Test and Verify Installed Tool
10. The user receives email about the tool’s status change. Now the Installed tool can be run in Ghub’s application space. It is not visible to others outside the development team.
To run the Installed tool, the development user may:
- visit the tool’s Contribtool page and click Launch Tool.
- use the Workspace command line to access /apps/toolname/dev and issue the invoke command.
11. Using Contribtool, the user may do one of the following:
- Approve the tool, if it works properly
- After running the workspace, making changes, and checking them into Subversion, the user may Update the code, and ask for it to be (re) Installed.
If tool code has been Updated, the Ghub Administrator receives email about this status change. The Ghub Administrator executes step 9.
12. If the new tool has been Approved, the Ghub Administrator receives mail about the tool’s status change. The Ghub Administrator will mark the tool Approved in the Contribtool page, after launching the tool to verify that it runs. From Contribtool, the Ghub Administrator:
- clicks the “Publish” link
- selects Publish from the dropdown, adds comments as needed, and clicks Submit.
tool status: PUBLISHED
This status change modifies the symbolic link /apps/toolname/current/ to point to the most recent revision of the tool.
The tool is now accessible to others on Ghub according to the access privileges the user set in Contribtool.
Maintenance: Update and Test Tool
13. At any time, the user can access the Workspace to make changes to the tool and check them into the Subversion repository. The user should then visit the Contribtool page to mark the tool as Updated (be sure to make a note about any compilation or other steps needed for the installation). The Ghub Administrator then executes step 9.
To run and test the tool from the Workspace command line, the user may access:
- /apps/toolname/dev to run Installed code
- /apps/toolname/current to run Approved code
The user may consult the ~/data/ subdirectories, sessions/ and results/, to assist in troubleshooting.